The Ultimate DTF Printing Guide: A Step-by-Step Approach

DTF printing success starts with the right equipment and preparation. You’ll need a printer with at least 720 x 2400 dpi resolution, DTF films, CMYK+W inks, and a heat press that can maintain 320-330°F. Begin by creating your artwork in professional software at 300 DPI, then print onto the film using proper RIP settings. Apply powder adhesive evenly, cure at precise temperatures, and transfer to fabric using medium-firm pressure. Regular maintenance and quality control checks are essential for consistent results. With proper technique and attention to detail, you’ll master the core steps to achieve professional DTF transfers. Let’s investigate the complete process in detail.
Key Takeaways
- Select a printer with minimum 720 x 2400 dpi resolution and white ink management system for optimal DTF printing results.
- Prepare essential materials including DTF films, CMYK+W ink set, curing powder, and a heat press with precise temperature controls.
- Create designs at 300 DPI using professional software, converting to CMYK mode and mirroring artwork for accurate transfers.
- Apply powder adhesive evenly while ink is wet, then cure at 325°F for 15-20 seconds before transferring to fabric.
- Implement regular maintenance schedules for printheads and rollers while conducting quality control checks throughout the printing process.
Preparing for DTF Printing
Before you start your DTF printing journey, you’ll need to select the right printer like the DTF Fedar and gather essential supplies including films, inks, and curing powder. You’ll want to familiarize yourself with professional design software such as Adobe Illustrator or CorelDRAW to create high-quality artwork. And don’t forget to mirror your designs and maintain high resolution (at least 300 DPI) to guarantee your final prints look stunning on fabric.
Choosing the Right Printer

Selecting the right printer serves as the foundation for successful DTF printing. You’ll want to focus on features specifically designed for DTF applications, not just any printer will do.
Let’s investigate what makes a quality DTF printer stand out. The most essential feature you’ll need is effective white ink management. This system keeps your white ink properly mixed and flowing smoothly.
You might wonder about print quality specs. Look for printers offering at least 720 x 2400 dpi resolution for crisp, detailed transfers.
Have you ever noticed how some prints look patchy? That won’t happen with proper printhead technology. Consider printers with Epson Precision Core printheads for consistent results.
Here are the must-have features to check:
- Automatic white ink circulation
- Built-in powder shaking system
- Anti-collision protection
- Film feeding mechanism
- Network connectivity options
Moving on to size considerations, you’ll want a printer that handles at least 60cm width for versatility in your projects.
Many businesses benefit from official warranty coverage when investing in professional DTF printing equipment from established manufacturers.
Gathering Necessary Supplies
Successful DTF printing requires five core supplies that you’ll need to gather: DTF films, specialized inks, curing powder, a heat press, and RIP software.
Let’s investigate each supply in detail. DTF films are specially coated PET sheets that’ll receive your design. You’ll want to stock both rolls and cut sheets to handle different project sizes.
When it comes to DTF inks, you’ll need a complete CMYK+W set. The white ink is particularly vital for achieving vibrant colors on dark fabrics.
You’ll find that high-quality curing powder acts as your adhesive bridge. Think of it as the matchmaker between your ink and the fabric – it needs to be distributed evenly for lasting results.
A reliable heat press is non-negotiable. You’ll use it for both curing the powder and transferring designs. Look for one with precise temperature controls.
Finally, don’t underestimate the importance of RIP software. It’s like your printing command center, managing color profiles and ink flow for best results.
Remember to source these supplies from reputable manufacturers. Quality materials lead to quality outputs – there’s no way around it.
Designing Your Artwork

Creating high-quality artwork is the foundation of DTF printing success. Let’s investigate the essential design preparation steps that’ll set you up for outstanding results.
You’ll want to start with professional design software like Adobe Illustrator or CorelDRAW. These tools give you precise control over your artwork’s details.
Have you ever noticed how some prints look pixelated? That’s why resolution matters. Always create your designs at 300 DPI or higher for crystal-clear printing techniques.
Remember to mirror your artwork before printing. It’s like looking in a reverse mirror – what you see on screen needs to be flipped horizontally.
Color management is vital in DTF printing. Convert your designs to CMYK color mode for accurate color reproduction.
Let’s talk about layers. Keep your design elements organized in separate layers for easier editing and troubleshooting.
Moving on to text, convert all fonts to outlines. This prevents any font compatibility issues during printing.
You might wonder about design size limitations. Scale your artwork to fit within your DTF printer’s maximum print width, typically 60cm.
Consider adding bleed areas around your design. This extra margin helps prevent unwanted white edges in the final transfer.
The DTF Printing Process
Let’s investigate how DTF printing comes together through five key steps that’ll transform your design from digital file to fabric. You’ll start by printing your design onto special DTF film, applying powder adhesive, and curing it properly before transferring to fabric. Once you’ve mastered these steps and added any optional finishing touches, you’ll be ready to create professional-quality DTF prints consistently.
Step 1: Printing on the Film

The DTF printing process begins with two essential steps for film preparation: properly loading your DTF film into the printer and configuring your RIP software settings.
Let’s investigate the film loading process. You’ll want to carefully align the DTF film with your printer’s guide markers. Confirm there aren’t any wrinkles or creases.
Moving on to your RIP software configuration, you’ll need to verify a few key settings. Set your color profile to CMYK+W and confirm your resolution matches your design needs.
You might wonder about mirroring your image. This step is vital – always enable image mirroring in your RIP software before printing.
Have you ever noticed how temperature affects print quality? Keep your printing environment between 70-80°F for best results.
Here’s a quick checklist for your printing process:
- Clean printheads before starting
- Check white ink circulation
- Verify film tension
- Monitor ink levels
- Test print a small sample
Remember to maintain consistent printing speed. Think of it like baking – rushing through this step can ruin your entire project.
Watch for any warning signs like streaking or banding. These indicate you’ll need to adjust your settings.
Step 2: Applying the Powder Adhesive

After your DTF film emerges from the printer with wet ink, you’ll need to move quickly into powder application. Think of this step as adding the magic ingredient that makes the transfer process possible.
You’ll want to make sure you’re using a high-quality powder adhesive specifically designed for DTF printing. Don’t try to cut corners here – the right powder makes all the difference.
Let’s examine the application process. You’ll need to apply the powder evenly across your entire design while the ink is still wet. Think of it like salting a dish – you want complete coverage without overdoing it.
For best results, you can use a powder shaker or automated powder application system. These tools help achieve consistent coverage every time.
Moving on to technique, hold your shaker about 6-8 inches above the print. Use gentle, sweeping motions to distribute the powder evenly.
You’ll know you’ve applied enough when the entire design has a uniform, frosted appearance. Any missed spots could lead to transfer failures later.
Remember to work in a well-ventilated area. The powder is fine and can become airborne during application.
Step 3: Curing the Powder

Once you’ve applied the powder adhesive, curing becomes a critical phase that transforms your DTF print from a powdery surface into a durable transfer.
Let’s examine the ideal settings for your curing process. You’ll want to heat your DTF transfers at 325°F (160°C) for 15-20 seconds in your heat press or curing oven.
You might wonder how to know when your powder is properly cured. Watch for the powder to transform from its grainy state into a smooth, glossy finish.
Keep an eye on your temperature control – it’s like baking a cake, too hot and you’ll scorch the film, too cool and your powder won’t melt properly.
Moving on to positioning, place your printed film in the center of your heating surface. Make sure it’s lying completely flat to guarantee even heat distribution.
Here’s a pro tip: use a laser thermometer to verify your heat press temperature. Surface temperatures can vary from what your display shows.
Let the cured print cool completely before handling. You’ll know it’s ready when the surface feels firm and smooth to the touch.
Remember to maintain consistent settings once you’ve found your sweet spot. This guarantees reproducible results across all your DTF transfers.
Step 4: Transferring to Fabric

With your cured DTF transfer ready, it’s time to move on to the critical fabric application phase. This step can make or break your final product, so let’s get it right.
Start by pre-pressing your garment for 5-10 seconds. You’ll want to remove any moisture and wrinkles that could interfere with the transfer.
Position your DTF transfer with the design facing down on your fabric. Make sure you’ve got it exactly where you want it.
Now it’s time to fire up that heat press. You’ll want to set it between 320-330°F (160-165°C) for ideal results.
Apply medium-firm pressure for 15-20 seconds. Think of it like making a sandwich – you want even pressure across the whole design.
Let the transfer cool down for about 5-10 seconds. Don’t rush this part – patience is key for a clean peel.
Now for the moment of truth: peel the film back slowly and smoothly. You should see your design perfectly adhered to the fabric.
For extra durability, consider giving it one final press for 5 seconds with a protective sheet. This helps seal the deal.
The premium quality of DTF printing means your design can withstand over 50 washes while maintaining its vibrant appearance.
Step 5 (Optional): Finishing Touches

The finishing touches on your DTF print can boost its durability and professional appearance. Let’s investigate some optional steps you can take to improve your final product.
You’ll want to start with a final press using parchment paper as a protective barrier. The heat press should be set to 320°F for about 10-15 seconds. This extra step helps seal in the design and increase print durability.
Here are some professional finishing techniques you can apply:
- Perform a stretch test to verify the transfer has properly bonded to the fabric. Gently pull the material in different directions to check flexibility.
- Apply a light coat of silicone spray to elevate the print’s sheen and protect against washing wear.
- Use a lint roller to remove any excess powder particles that might have scattered during the transfer process.
You might notice that your print feels slightly raised after the final press. That’s perfectly normal and actually indicates proper adhesion. The design will settle and become more flexible after the first wash.
Moving on to care instructions, remind your customers to wait 24 hours before washing their DTF-printed items.
Troubleshooting Common DTF Printing Issues
When you’re troubleshooting DTF printing problems, you’ll likely encounter three main issues: color mismatches, incomplete transfers, and mechanical problems like clogged printheads. You can solve most color issues by checking your color profiles and ensuring your design files are in CMYK format before printing. If you’re seeing incomplete transfers or mechanical problems, start by verifying your heat press settings and powder application, then move on to checking your printer’s maintenance needs.
Color Mismatches
Color matching issues can quickly derail your DTF printing projects if you don’t address them early. You’ll want to guarantee ideal color vibrancy while maintaining consistent output across all your prints.
Let’s investigate the most common color-related challenges you might encounter:
- Your RIP software isn’t properly calibrated with your printer’s CMYK color settings, leading to unexpected color shifts
- The white ink isn’t being applied evenly, causing inconsistent color saturation on dark fabrics
- Your design files are in RGB format instead of the required CMYK, resulting in dull or inaccurate colors
You’ll need to regularly calibrate your printer and RIP software to maintain color accuracy. This process guarantees your prints match your digital designs consistently.
Have you ever noticed how different lighting conditions can affect color perception? That’s why it’s essential to evaluate your prints under standardized lighting conditions.
Moving on to practical solutions, you should create color test strips before large production runs. This simple step can save you time and materials by catching color issues early.
Remember to document your successful color profiles. You can reference them for future projects requiring similar color schemes.
Incomplete Transfers
Incomplete transfers represent one of the most frustrating challenges you’ll face in DTF printing. You’ve done everything right, but parts of your design just won’t stick to the fabric.
Let’s investigate the main culprits behind these troublesome transfers. Your heat press settings might need adjustment – temperature, pressure, and time are essential variables you’ll want to check first.
Have you ever noticed how powder distribution affects your transfers? An uneven application of DTF powder can leave gaps in adhesion. You’ll want to guarantee complete coverage across your design.
Temperature problems often lurk behind incomplete transfers. You might be running your heat press too cool, preventing the powder from fully melting and bonding with the fabric.
Moving on to pressure issues, insufficient pressure during transfer can leave parts of your design clinging weakly to the fabric. Think of it like trying to stick a band-aid with just your fingertip – you need firm, even pressure across the entire surface.
Let’s tackle timing next. If you’re rushing the transfer process, you’re setting yourself up for failure. Give your transfers the full recommended time under heat and pressure.
You’ll also want to verify your fabric is completely wrinkle-free before transfer. Pre-pressing can make a world of difference.
Other Potential Issues
Beyond color mismatches and incomplete transfers, you’ll encounter several other technical challenges in DTF printing that can impact your output quality. Let’s investigate some common issues you might face and their solutions.
Poor print quality often stems from maintenance oversights. You’ll need to regularly clean your printheads and maintain proper ink levels to guarantee crisp, vibrant output.
Here are the most frequent technical hurdles you’ll need to overcome:
- Ink clogging in printheads – Combat this by running regular cleaning cycles and keeping white ink in constant circulation
- Print head alignment issues – Calibrate your printer settings regularly and check for any mechanical obstructions
- Film feeding problems – Clean your rollers frequently and verify your film is properly loaded
You might notice your prints becoming fuzzy or showing banding patterns. This typically indicates it’s time for a thorough maintenance check.
Moving on to prevention, establish a regular maintenance schedule. Think of it as giving your printer a spa day – it needs that regular TLC to perform at its best.
Remember that most technical issues are preventable through proper maintenance and monitoring. Stay proactive rather than reactive.
Conclusion
Success in DTF printing requires mastering several key elements: proper equipment setup, high-quality supplies, careful design preparation, and precise execution of each step.
Understanding common challenges and implementing best practices will significantly improve your printing outcomes. Your journey may involve some trial and error, but that’s how expertise develops.
Check out the DTF Fedar system for enhanced print quality with its integrated white ink stirring mechanism.
Stay updated on new developments in DTF technology and materials. Document what works and what doesn’t – every print job is an opportunity to perfect your craft.
You’re now equipped with the fundamental knowledge to start your DTF printing journey. Take these insights and watch your printing capabilities soar.
Frequently Asked Questions
How Long Does DTF Printed Designs Typically Last on Garments?
Want to invest in long-lasting custom apparel? Your DTF printed designs can last 50+ wash cycles while maintaining vibrant colors when properly cared for, making them a durable choice for your garment customization needs.
Can DTF Prints Be Applied to Materials Other Than Fabric?
You can apply DTF prints to various materials beyond fabrics, including leather, wood, metal, glass, and ceramics. You’ll need to adjust your heat and pressure settings based on the specific material’s properties.
What Is the Average Cost per Print for DTF Transfers?
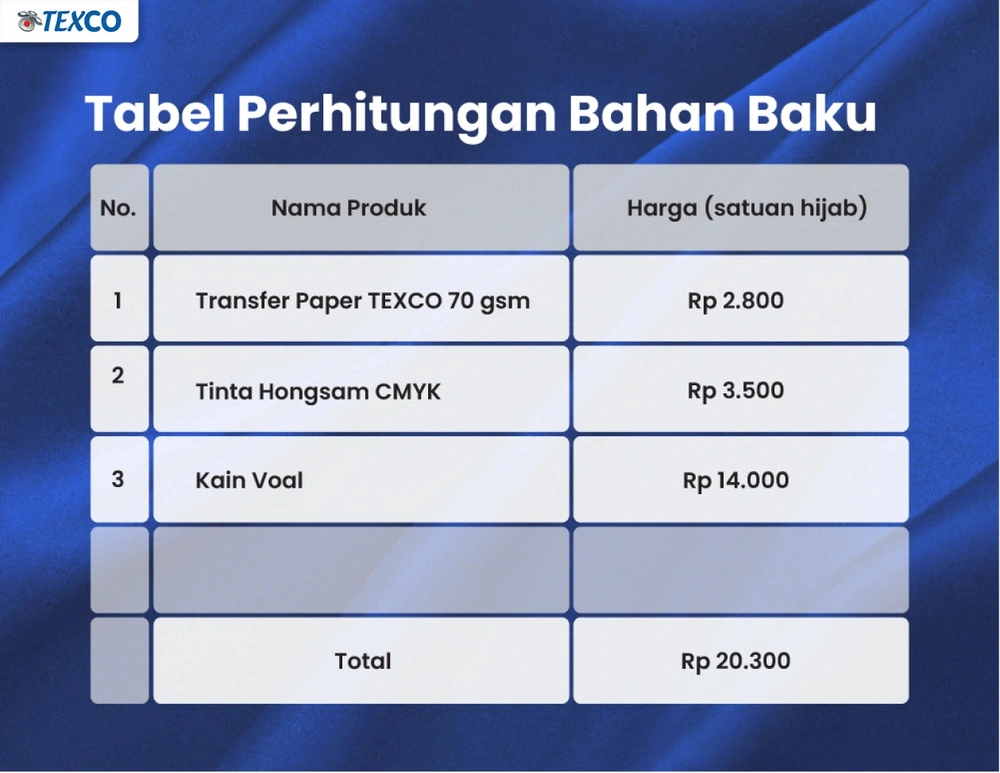
You’ll typically spend $0.50 to $2.00 per DTF transfer, depending on size and complexity. Your costs include film ($0.15-0.30), inks ($0.20-0.80), powder ($0.15-0.40), and minimal electricity usage.
Is DTF Printing Environmentally Friendly Compared to Other Printing Methods?
Let’s cut to the chase: DTF printing isn’t as green as you’d hope. While it uses less water than screen printing, it still relies on plastic films and chemical-based inks that aren’t biodegradable.
Can I Wash DTF Printed Garments in Hot Water?
You’ll want to wash DTF printed garments in cold or warm water, not hot. While DTF prints are durable, hot water can gradually degrade the adhesive bond and reduce your print’s longevity.